
Wairere Falls is a spectacular waterfall located in the Kaimai Mamaku Conservation Park, between Te Aroha and Matamata, on the North Island of New Zealand. Standing at 153 metres tall, it is the highest waterfall in the North Island and one of the highest in the country.

The views are worth the hike!
Although the Wairere Falls is visible from a distance, the charm lies in hiking to either its lookout point or to the top of the falls. The falls are accessible via a well-maintained track, allowing visitors to experience the stunning views and natural beauty of the area.
With this guide, we want to share our experience of visiting Wairere Falls and what to expect on your hike to the lookout point.
How to visit Wairere Falls?
To embark on the journey to Wairere Falls, travellers can easily make their way from Hamilton, which is approximately 45 kilometres away. Simply hop on State Highway 29 and head southeast, enjoying the picturesque drive for about 45 minutes.

Leaving Te Aroha on the Te Aroha – Gordon Road
Similarly, visitors coming from Tauranga, situated approximately 53 kilometres to the north, can take State Highway 29 and travel southwest for around an hour.
Alternatively, Matamata (better known as the location for the Hobbiton Movie Set) and Te Aroha are only a short 15-minute or 20-minute drive away respectively, making it a convenient starting point for those staying in the immediate vicinity.
Our visit to Wairere Falls was planned more as a “hiking pit-stop” as we drove from Auckland to Tauranga (Mount Maunganui). It gave us a chance to not only stretch our legs but also admire this hidden gem!

Views of the gorgeous Kaimai Mamaku Conversation Park on the drive to Wairere Falls
Here’s a quick glimpse of our adventure to Wairere Falls.
Subscribe to my YouTube channelStarting point – Wairere Falls Track
Wairere Falls Track starts from Goodwin Road off Te Aroha-Okauia Road, south of Te Aroha.
The car park, which is the starting point, is located 800 metres off Old Te Aroha Road on Goodwin Road. Interestingly, the waterfalls are visible as you drive into the car park.

This is the view of Wairere Falls from the car park
Securely park your car, put on your hiking boots, and prepare to set out on an incredible hike.
The Wairere Falls Hike
While deciding to hike to Wairere Falls, you have two options,
- Hike to the Wairere Falls Lookout, or
- Hike to the top of Wairere Falls
As we had limited time to complete our hike, we chose the former and hiked to the lookout and that’s what this guide will focus on.
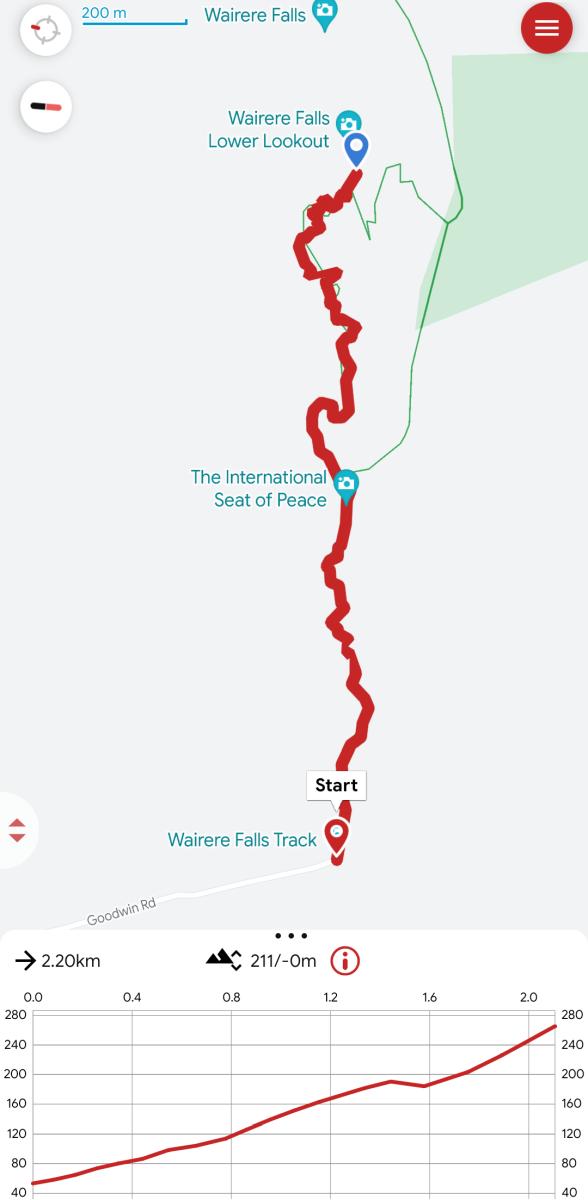
Wairere Falls Walk Map and Elevation profile
The hike to the Wairere Falls Lookout is approximately 1.8 km one-way and can take around 45 to 60 minutes. We definitely recommend wearing proper hiking boots or shoes as the terrain is extremely rocky and slippery closer to the waterfall.
From the lookout, if you decide to continue to the summit of the falls, be prepared to hike for another 800 metres (approximately). Although that’s a short distance, it will take you the same amount of time (45 minutes) thanks to the very steep and rugged terrain that follows.

The entrance to the Wairere Falls Track with a view friendly reminders
The hike to the falls is exhilarating, taking adventurers through a well-marked and maintained trail. The track stretches a little over 5 km round trip, winding through native forest and gradually ascending towards the viewing point or the top of the falls, depending on one’s preference.
With that, let us share our experience of the Wairere Falls Hike.
Car Park to the First Bridge
As with all our hikes, we prefer to divide them into sections, making it easier for us to convey the progression of the trail.
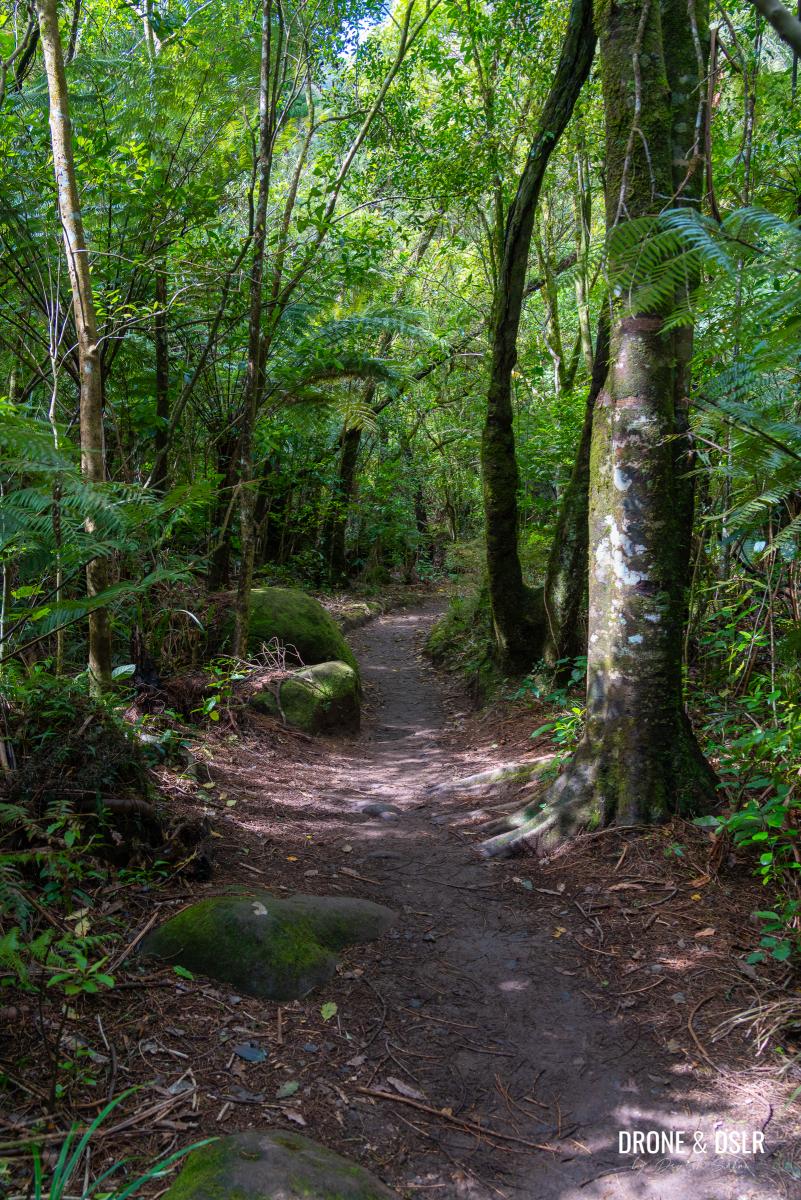
As you enter the Wairere Falls Track from the car park, you’re instantly pulled into the vibrant foliage and lush atmosphere that surrounds the waterfall.

The start of the Wairere Falls Track
The initial section of the Wairere Falls Track is quite easy, with a very gentle incline. The trail is mostly a dirt track with a few rocky sections.
-

- The initial section of the track is an easy walk

-
- Observe the many moss covered rocks and trees on the Wairere Falls Track

Continue walking on the Wairere Falls Track for approximately 550 metres till the first bridge.

The first wooden bridge
As the track runs along the stream, there are three wooden bridges that cross the stream at different points. Each bridge offers a stunning view of the stream and its cascades.

The view of the stream and cascades below the first wooden bridge
To the International Seat of Peace
Cross the bridge and continue walking on the Wairere Falls Track for another 250 metres till it briefly emerges from the shade, next to a grassy incline on the right-hand side.
-
- The walk continues at an easy pace after the first bridge

-
- The uncovered part of the track where the International Seat of Peace is located

On top of the incline are unique-looking benches dubbed the “International Seat of Peace”.

A short uphill walk brings you to the International Seat of Peace
The benches overlook a beautiful 1,000-acre dairy farm run by the farmer responsible for these benches. You can read all about the International Seat of Peace in this short article while you admire the views from there.
-
- Taking a well earned break on the International Seat of Peace at Wairere Falls Track

-
- Take a moment to appreciate this breathtaking view from the International Seat of Peace

-
- The famed paddock 66 that was closed by the farmer

-
- Can you spot the second International Seat of Peace in this lush field?

You can either walk up the benches on your way to the waterfall or on your way back.
To the Second Bridge
The Wairere Falls Track becomes progressively more intense as it advances, with a consistent ascent starting after reaching the International Seat of Peace.
The Wairere Falls Track returns to the shade
At this point, the track also returns to the shade in the forest area. Fortunately, the ascent along this section isn’t too challenging. It climbs at a moderate pace and the only indication that you’ve gained altitude is when you look down and see at the stream below.
-
- The track slowly begins its ascent

-
- The track remains shaded and fairly even at this section, making the ascent easy

-
- The only sign of the ascent was when we saw the stream below us

The other characteristic about this section of the trail, that we didn’t appreciate till later, is that it’s a flat dirt track. Because that changes after the second bridge.
-
- The second wooden bridge

-
- The stream below the second wooden bridge

To the Third Bridge
After crossing the second bridge, the dirt track gives way to a rocky terrain that runs along the side of the hill.

After the second bridge, the track runs between the side of the hill and the stream
The trail does become a bit more challenging to navigate but fortunately, there are wooden steps and paths laid down.

Luckily, there is a maintained path on this section of the track
The undulating track crosses moss-covered rocks and tree roots as it continues to climb with scenic views of the stream.
-
- This section of the track involves navigating your way through rocks

-
- One of the more picturesque cascades we saw on the hike

-
- One of the more photogenic spots on the track, showcasing the vivid beauty of the moss-covered rocks and flora

Keep walking till you reach the third and final bridge, which is less than 200 metres from the second bridge.
-
- The third and final wooden bridge

-
- The beautiful cascade below the third bridge

The Final Ascent to The Lookout
A few short metres after crossing the final bridge, you’ll be greeted by a wooden platform with a stairway.

The stairway after the third bridge
Gently follow the wooden steps to the top where the trail continues its uphill ascent.
-
- Go slow, there are a lot of steps

-
- The incline continues after the stairway

Further ahead, the trail becomes very rocky and slippery. I imagine this is because of the proximity to the falls. So, be careful along this section of the trail.

The final section of the ascent to the lookout consists of a slippery, rocky terrain
Finally, keep your eyes peeled for a marker at an intersection of three trails. Above the marker are signs for the lookout and the top of the falls.

Lookout for this marker at the intersection of the trails and follow the sign
So, depending on where you’re headed, follow the sign.
Wairere Falls Lookout
As we were headed to the Wairere Falls Lookout, we walked in the direction of the lookout for about 50 metres where we were greeted with majestic views of Wairere Falls!
-
- The final 50 metres to the lookout point

-
- The Wairere Falls Lookout — isn’t it beautiful?

The lookout is a viewing platform with a wooden bench that offers a framed view, through the trees and branches to one of the most beautiful waterfalls that we’ve seen!
-
- Our first view of Wairere Falls from the lookout

-
- Admiring the view of Wairere Falls from the lookout point

We were enthralled by the 153-metre plunge in two steps over the Kaimai escarpment, part of the Okauia fault line.

Wairere Falls — framed by nature
We sat at the lookout, enjoying a pudding that we’d bought at a weekend market earlier, for approximately 20 minutes, soaking in the views of North Island’s tallest waterfall!
-
- Not only can you admire the waterfall but also catch a glimpse of the native fauna and amidst the vibrant foliage

-
- You will be greeted by lush greenery and the familiar sound of rushing water

The wind was so strong on the day we visited that it was blowing away all the water at the crest of the fall.

The wind on the day was so strong that it was blowing away the water at the top
It was a blissful evening.

Wairere Falls offers a remarkable natural oasis for those seeking to connect with the beauty of New Zealand’s great outdoors
Continue to the top or return to the car park
Unfortunately, we had to make it to Mount Maunganui (where we had the Mauao Summit Walk waiting for us) before sun down which made us realise that we couldn’t hike to the top of the waterfall.
However, if you have the time and energy to continue hiking, follow the signs from the intersection to the “Top of falls”.
But to end the hike, simply trace your steps back to the car park. After the slippery, rocky section of the track, it shouldn’t take you much time to return to the starting point.
Our guide to the Wairere Falls Walk
We hope that you found our guide to the Wairere Falls Hike resourceful and that it gives you an idea of what to expect.
For those staying in Matamata, Wairere Falls is a fantastic option for a day hike if you’re looking for something to do after visiting the Hobbiton Movie Set.
Wairere Falls offers a remarkable oasis for those seeking adventure, tranquillity, and the chance to reconnect with the beauty of New Zealand’s great outdoors.

The majestic Wairere Falls
It really is a hidden gem that is easily accessible from neighbouring cities and beckons travellers from far and wide to experience the thrill of the hike and the breathtaking beauty that awaits at the top!
You might also like


Leave a reply